Saturday, February 6, 2021

Two new boxcars (or is it three?)

Needing a couple more boxcars, I ordered two Kennebec Central boxcar kits from Mt. Blue Model Co.  Why KC and not an SR&RL prototype like the boxcar already on the roster (#35)?  The shorter length and more basic look of the KC cars is more in keeping with the idea of a less-developed railroad like the Kennebec Central or Monson RR, compared to the boxcars used in the later decades of the SR&RL.  A side benefit is that the KC cars are quicker to build since they only had a couple of grab irons, no stirrups, and handbrakes instead of air brakes.

The new cars were numbered 23 and 24.  For variety, I weathered #23 heavily but left #24 pristine, as if it was recently repainted.  To reinforce that idea I used a smaller font on #24:

The idea to use smaller lettering on the "repainted" car didn't occur to me until after I had already lettered one side.  After debating which side I liked better, I had another idea: since the layout is a shelf layout and only one side will be seen during an operating session, why not number the two sides differently, so that the car can be flipped around occasionally to represent a different car?  So the number on the reverse side was changed to 25, giving me three cars for the price of two!

As with all of my freight cars, the trucks are from Marsh Creek Miniatures and were 3D printed by Shapeways.  Some two-foot freight cars only had brakes on one truck, so to replicate that look I removed the brakes and frame extensions from one truck on each car.  

The Marsh Creek trucks are designed for Fox Valley Models 36" N scale wheelsets (20" in HO) with .540" axles. The FVM wheelsets are hard to find at the moment, but I learned from another modeler that Eastern Seaboard Models is now producing wheelsets of the same dimensions.  I ordered some to try on these cars and they look good and roll well, so it's great to have an alternative to the FVM wheels.


Monday, January 25, 2021

Adding a staging yard

My original track plan included additional sections for the harbor town of Tennant's Harbor (now spelled Tenants Harbor) and a quarry.  Since I won't get around to building those sections for a while (if ever!), I added a four-track staging yard to allow me to run trains in and out of Thomaston. One track will represent the quarry, two will be reserved for Tennant's Harbor, and the fourth will be an escape track to allow locomotives to run around their trains.  The railbus gets its own cassette so that I don't have to dedicate an entire track to it.

I used Kato N scale unitrack so the tracks can be easily reconfigured in the future.  The unitrack is code 80 which matches the Peco track used on the rest of the layout, so I simply soldered a short piece of unitrack to the adjoining flextrack and then connected the staging yard to that piece.  All of my locos and rolling stock handle the #6 turnouts without problems, and the turnouts are power-routing so electricity is only fed to one track at a time.  At some point I may add an electrical control panel but for now I just operate the turnouts manually.

The staging yard runs in front of a window well so there is a fence on both sides to prevent accidents.  At the far end there is a unitrack plate girder bridge that serves as a cassette to turn locomotives.  The unitrack joiners make it easy to align it with the staging tracks.  

The tracks are laid on 1/8" cork that ends just short of the cassette.  There is a sheet of white styrene under the cassette that shims it to match the staging tracks and also makes it easier to see what you're doing as you move the cassette between tracks.  

Sunday, January 10, 2021

Lighting for the freight house

The freight house will have both exterior and interior lighting: an exterior light over the entry door and two overhead lamps inside.  For the exterior light, I used a gooseneck lamp from Woodland Scenics' "Just Plug" series of lighting fixtures. The "Just Plug" system includes a base station that controls the current to each light, and the fixtures have plugs that plug directly into the base station.  Since I don't actually use the "Just Plug" system, I cut off the plug and wired in a 1000 ohm resistor to adapt it to my variable-voltage lighting bus. Here it is hooked up to a 9V battery:

For the interior lighting I used a couple of HO scale spotlights purchased from a Chinese company, also with 1K resistors. Since these lights gave a cool white light, I colored the lenses with a yellow sharpie to warm them up.  When I added lighting to my station I used theatrical lighting filters to adjust the color temperature, but the sharpie is a lot easier!  

In both photos you can see that I'm using yellow/black for the lighting wiring to distinguish it from the track wiring (black/red for the blocks and blue and white for the two cab busses). 

Friday, January 1, 2021

Freight house update

It's hard to believe it's been almost three years since I started the freight house kit from Bollinger Edgerly Scale Trains (see previous post here), but I've been making some progress on it over the past couple of weeks.  Since the building will have lighting, I first installed a floor and added some interior details, including a few piles of crates and barrels from Bar Mills Scale Model Works, a pile of timbers, and a somewhat crude stack of sardine crates carved out of a pine block.

The crates are supposed to be from a cannery at the other end of the line, and they actually have decals on the front that read (note the old spelling of Tenants Harbor):

4 DOZ. TINS – MAINE SARDINES
WEIGHT 10 – OZ. EACH
PENOBSCOT CANNING
TENNANT’S HARBOR ME

Or at least that's what they are supposed to say... My home printer doesn't have anywhere close to the resolution necessary to print the tiny lettering, but they add texture and it was interesting to research what typical sardine crates would have looked like.  Here's how they look through the door, using a flashlight to mimic interior lighting:


The loading dock has over 200 individual pieces but my mini chop saw made quick work of cutting them. The stringers and decking were assembled using a jig to keep everything square.

After installing the legs and bracing I test fit the structure and loading dock sections on the layout, with a narrow gauge flat car and standard gauge boxcar to check heights and clearances. The freight house will sit on a slope, so the timber piers supporting the freight house will need to be 1/4" longer in the back. 


In addition to the structure piers, lighting and roof, there are still a few trim pieces to be installed. It's been a fun kit to assemble so far and it should look good sitting between the station and the transfer crane.

Wednesday, December 16, 2020

SR&RL models

I have been steadily accumulating freight car and structure kits for a future layout based on the Sandy River and Rangeley Lakes, which is my favorite of the Maine two-foot gauge lines. Recently I started building some of them, starting with a few freight cars. The coal gondola is a resin kit from F&C, and the rest are laser-cut kits from Mount Blue Model Co. 


The side and end panels for the rack cars were scratchbuilt from strip wood using this simple jig. A bit tedious but the result was worth it!


I've also been working on models of buildings that were located in Kingfield, Maine, including the wood/tool shed, the hydrant house, and the car repair shop. All three kits were released many years ago and are out of production. The tool shed is by Chris Cardinal, the hydrant house is by Kennebunk Models with modifications to match prototype drawings, and the car shop (still in progress) was produced by Portland Locomotive Works. All are painted in the Maine Central color scheme that was used on the SR&RL following its acquisition by the MEC in 1912.


While these buildings are intended for my next layout I will use them on the current one as well, near the roundhouse which will be scratchbuilt. I still need to reinstall the turntable, which was removed when I moved this section back into the train room.

Tuesday, December 15, 2020

Ball signal

The ball signal is a B.E.S.T. (Bollinger Edgerly Scale Trains) model of the Whitefield Junction signal in New Hampshire. The signal is set to allow the narrow gauge to cross the Maine Central track.  The shack is from Portland Locomotive Works and is based on a structure by Sam Swanson. 


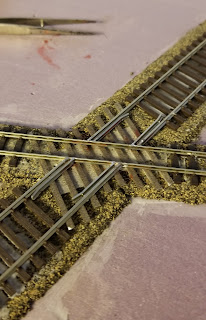
The final step on the crossing was installing the guard rails inside the diamond. Like the other guard rails on the narrow gauge track, it was made using plastic rail to avoid electrical shorts.


Saturday, September 5, 2020

Crossing the standard gauge

Track is now installed on the new section, including the broad 21" radius curve in the corner. I use yardsticks with holes drilled at 1" intervals to lay out my curves.  Here one yardstick is clamped to the benchwork to find the center of the curve in the aisle, and another is being used to mark the track centerline.  The shelf to the right is for the staging yard:

Since the Thomaston station is now located within the town itself, instead of outside of town as I originally planned, the railroad would have had to cross the Maine Central Rockport branch east of town. This could make for a neat scene, with a ball signal to control the crossing, so I decided to include it.

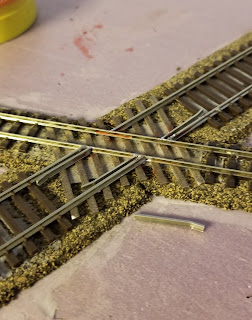
For the sake of reliability, I first glued down the narrow gauge track and then built the crossing in place using code 83 standard gauge track and rail. After laying ties made from styrene strip, the track sections were cut to fit and soldered to the narrow gauge track, and then short pieces of rail were cut, bent, and filed to form the guard rails and soldered inside the standard gauge rails. 


Next the flangeways for the standard gauge were cut into the narrow gauge track using a cut-off disc in a motor tool. Only the head and web of the rail were cut, leaving the base intact to conduct current across the diamond. After cleaning everything up with files and a track cleaner, I got out the rail bus to make sure everything still ran smoothly.   


The final step was installing guard rails on the narrow gauge. To avoid creating a short between the two rails (not an issue with the non-operating standard gauge track) I made these with plastic rail salvaged from the Walthers traveling crane kit that I turned into a stationary crane for the transfer track (see previous post here). After the track is painted and ballasted everything should blend together nicely. 


The ball signal and a maintenance shack are almost finished so I will post a mock-up of the entire scene soon.